Country Cottage Bedroom Transformation — Braintree, Essex
The Starting Point
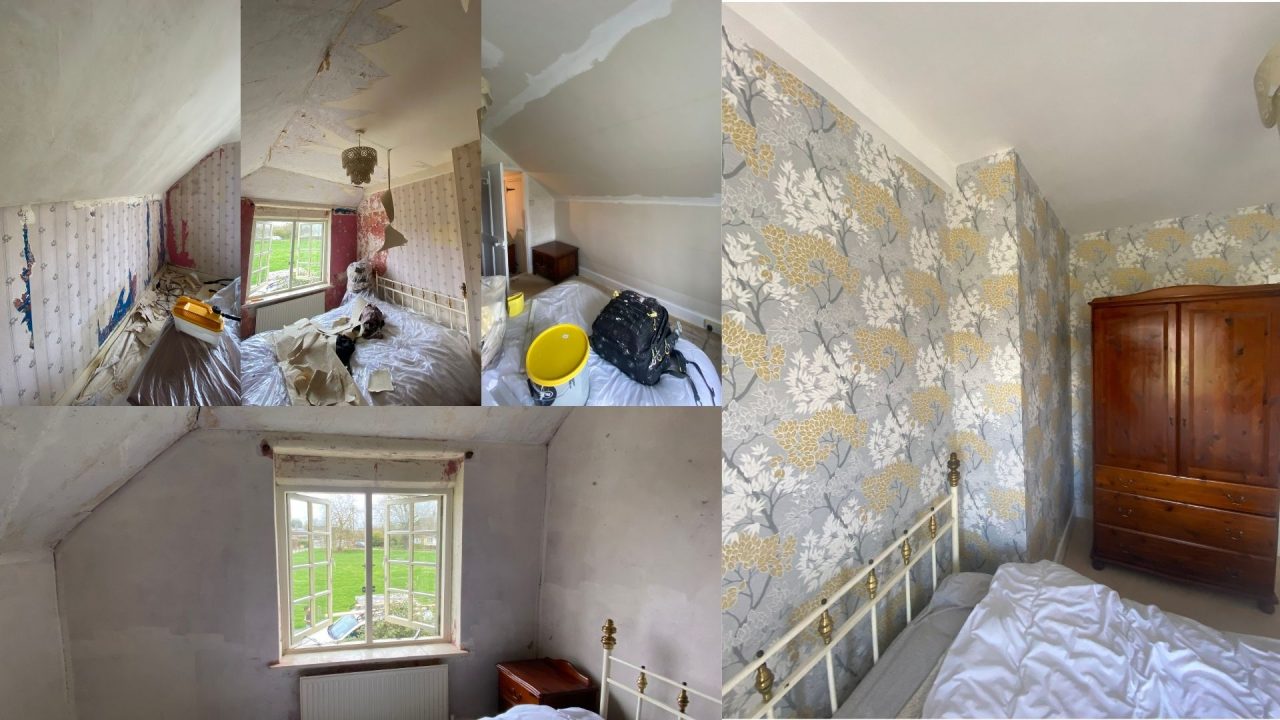
This one was never going to be a quick job. The bedroom in this country cottage hadn’t been decorated in many years, and it showed. Wallpaper was lifting, the ceiling paper had had enough, and once I started stripping it back it became clear the walls underneath were in genuinely poor condition — not just tired, but fragile. The kind of walls that crumble at the edges if you go at them wrong.
This is the sort of project where the temptation is to fill straight away and crack on. In my experience that’s the wrong call, and I’ll explain below exactly why I did it in the order I did.
The Preparation — Where Most of the Work Lives
Good decorating is almost entirely preparation. The finishing coats at the end take a fraction of the time that everything below them takes, and if the prep isn’t right, no amount of quality paint or paper will save it.


Stripping back
- Removed all the existing wallpaper and ceiling paper fully, rather than papering over it — old paper beneath new paper is a recipe for failure, particularly on walls that have already started to move
- Exposed walls were in poor condition throughout — surface was soft and friable in places
Sealing before sanding — the step most people skip
This is something I do on walls in this condition that a lot of decorators don’t bother with: I sealed the walls before sanding, not after. Bare, damaged plaster is porous and soft — if you go straight in with a sander you’re working against a surface that just crumbles under the abrasive. Sealing first firms the surface up, gives the sander something to work against, and means you get a cleaner, more consistent result.
- Applied a diluted sealant coat across all walls to consolidate the surface
- Once dry, sanded back using my dustless sander — the dustless system makes a real difference in an occupied home, keeping the mess to a minimum and allowing faster re-entry to the room
Filling
Once the walls were sanded back to a sound, stable surface, the filling stage could begin properly.
- Extensive filling throughout — this wasn’t a touch-up job, it was a full repair across most of the wall surface
- Filled, allowed to cure, sanded back, then sealed again before lining
This second seal after filling is important — fresh filler is also porous, and sealing it before lining prevents the paper paste from being absorbed unevenly, which causes bubbles and poor adhesion.
Lining the Walls and Ceiling
With the walls properly prepared, the room was ready to line.
- Hung 1200 grade paste-the-wall lining paper throughout — walls and ceiling
- 1200 grade is a quality, heavy lining paper; it bridges minor surface imperfections that remain after prep and gives a far better surface for both paint and decorative paper than a lighter grade would
- Paste-the-wall application rather than pasting the paper itself — easier to handle, particularly on a ceiling, and gives consistent coverage
The Painting and Woodwork
Ceiling
- Two coats of flat ceiling paint — flat finish eliminates any surface texture shadows and gives a clean, uniform result under natural light
Woodwork — the right order matters
- Prime, fill (any knocks and gaps), and undercoat first
- Light sand between coats
- Top coat applied last once the undercoat is fully cured
Getting the woodwork done before the final wallpaper goes up protects the new paper from brush splashes and means any cutting-in against the woodwork is clean from the start.
Hanging the Decorative Wallpaper
With ceiling painted, woodwork top-coated, and walls fully lined and dry, the decorative wallpaper was the final stage — which is how it should be. By this point the room had a sound, stable, prepared surface on every face, and the paper went up cleanly.
The Finished Result
What started as a bedroom in very poor decorative condition — soft walls, failing paper, years of deferred maintenance — came out as a freshly decorated, properly finished room that should stay that way for years.


If your room is in a similar state and you’re not sure where to start, the honest answer is: the process above takes time, and cutting steps out of it is where long-term problems come from. I cover [the Braintree and Essex area] and am happy to take a look and give you a straight assessment of what your room needs.